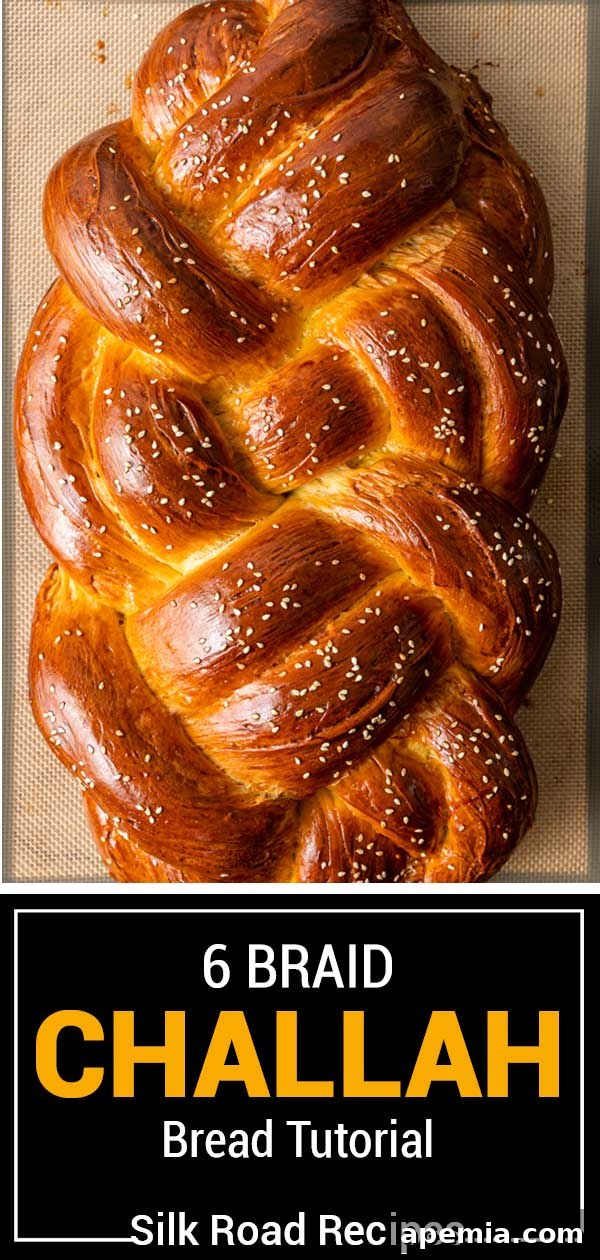
Mastering Challah Bread: Your Ultimate Guide to a Perfect 6-Braid Loaf
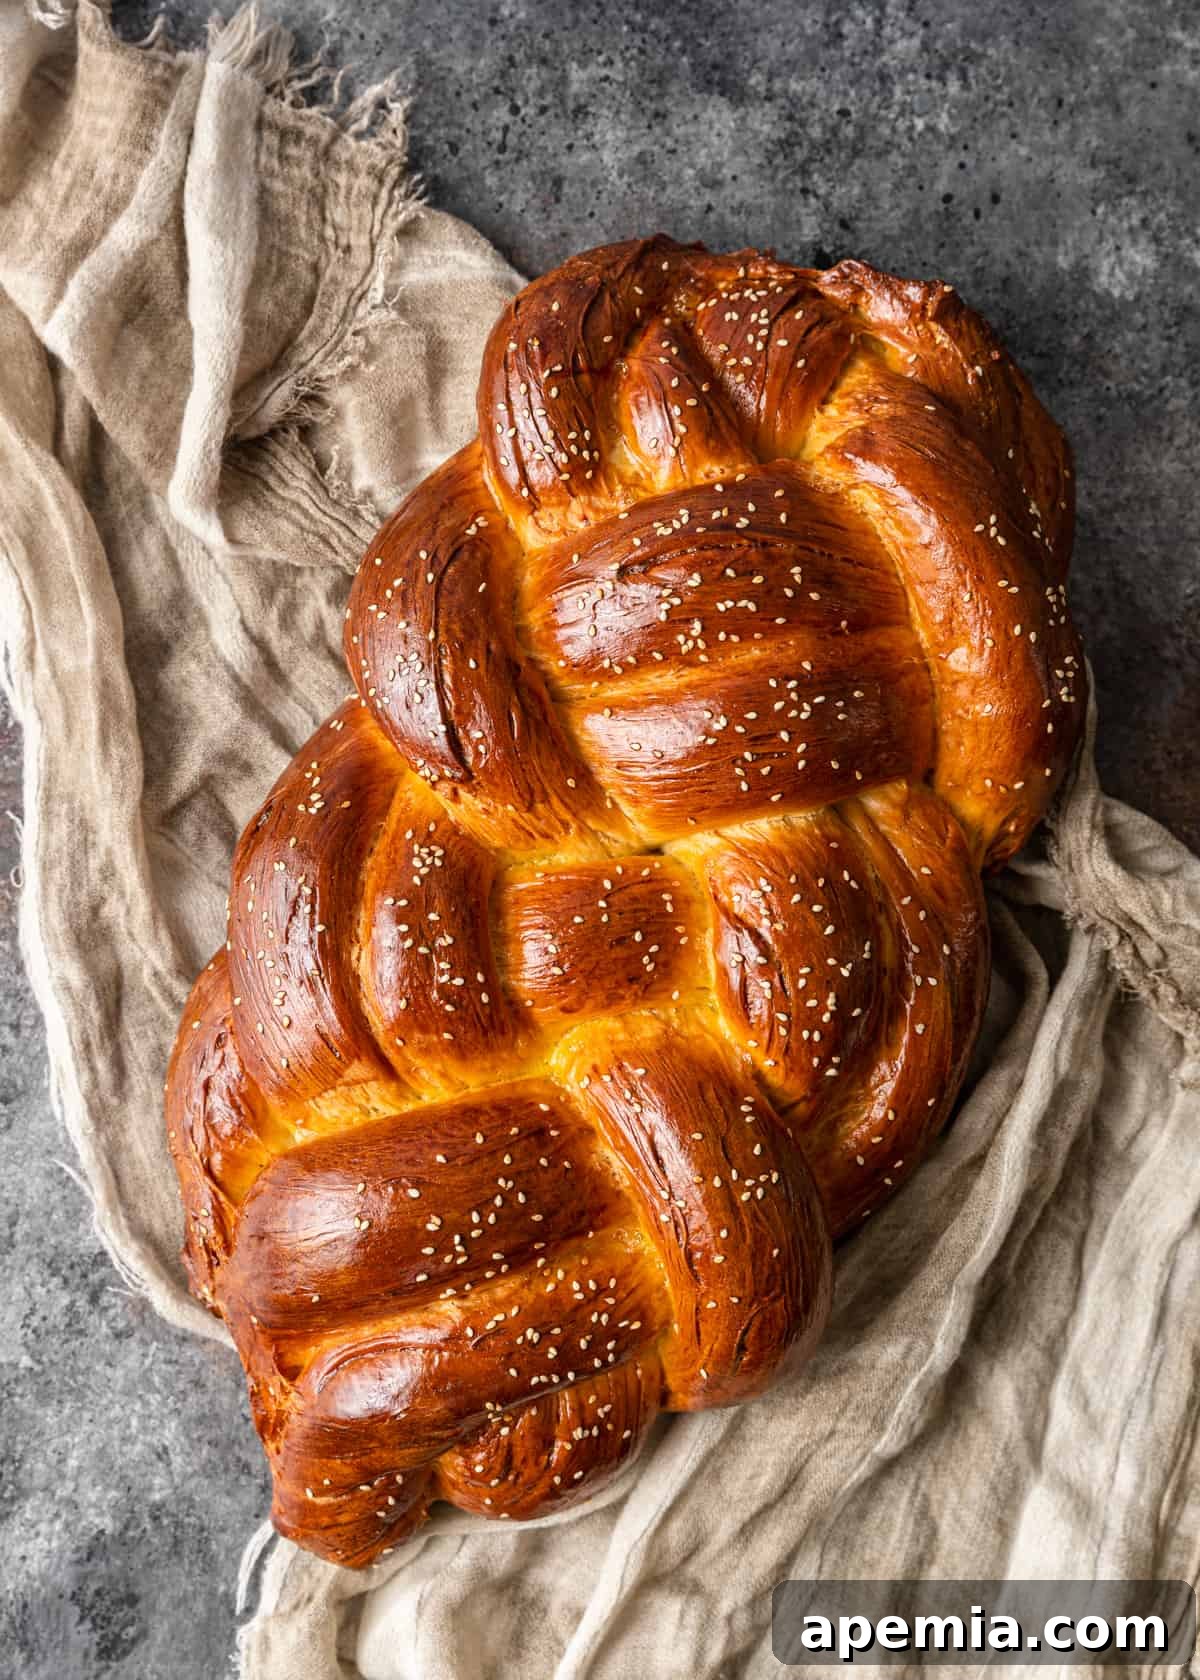
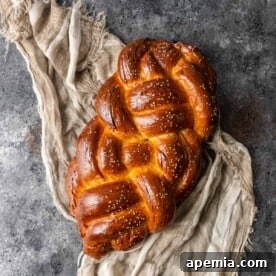
Challah is far more than just a traditional Jewish celebration bread; its exquisite beauty and irresistible flavor make it a welcome addition to any table, any day of the week! This iconic loaf is celebrated for its distinctive rich, slightly sweet taste, a wonderfully crispy golden-brown exterior, and an incredibly soft, pillowy-light interior. Whether you’re a seasoned baker or new to the world of bread making, our easy-to-follow, step-by-step Challah bread tutorial will expertly guide you through creating this magnificent loaf right in your own kitchen.
Why Bake Homemade Challah?
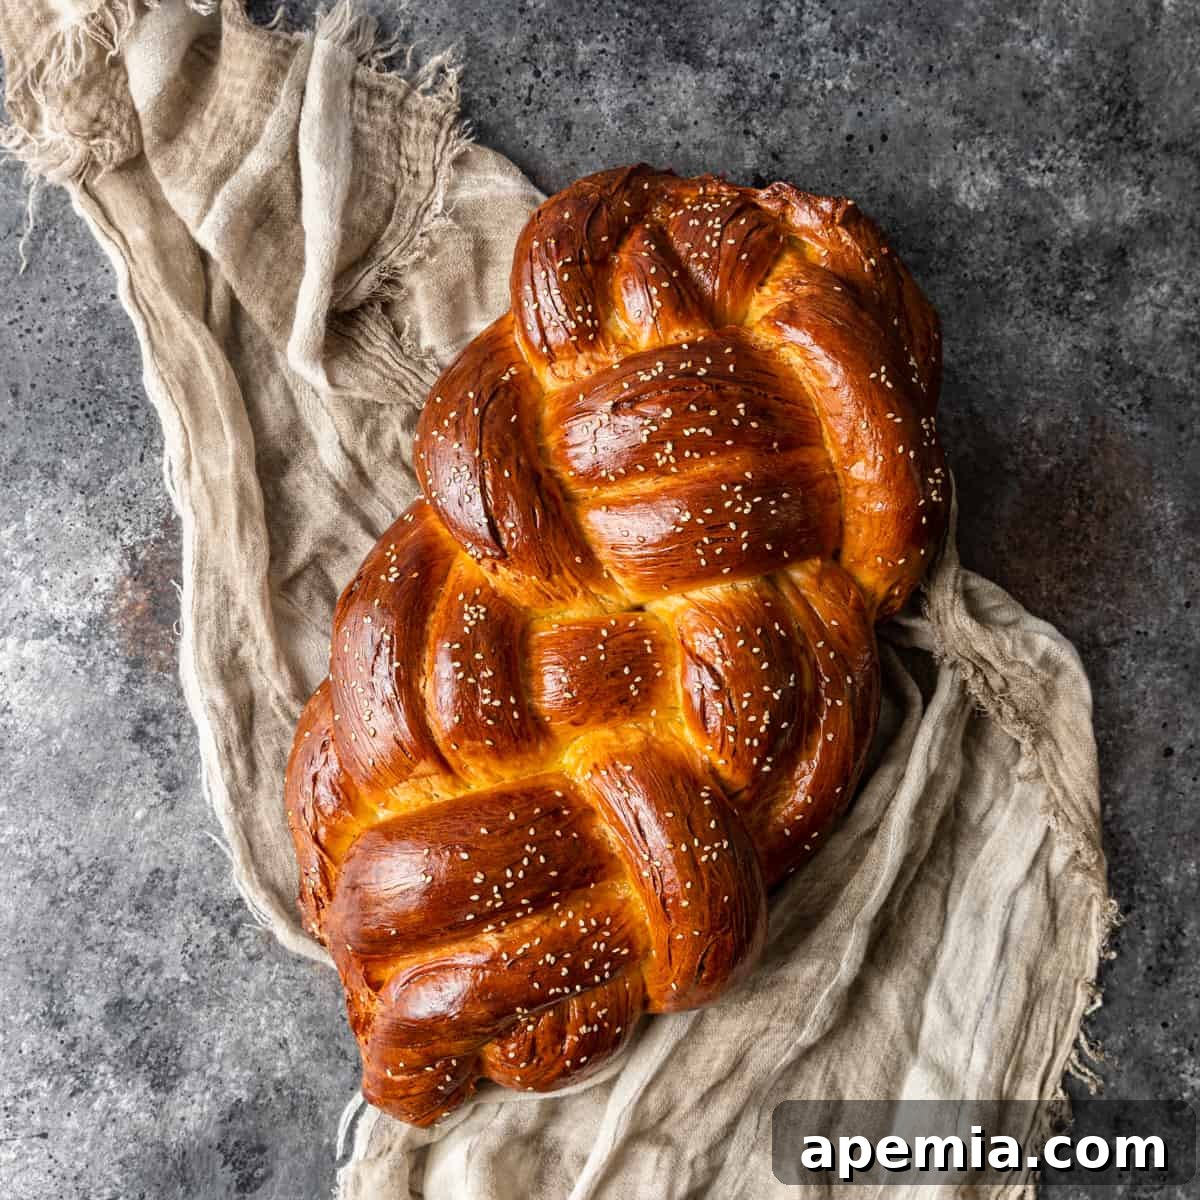
Searching for a show-stopping centerpiece for your next special gathering or simply craving an exceptionally delicious bread for your family? Look no further than Challah. This traditional Jewish loaf is instantly recognizable, not just for its deep cultural roots but also for its visually stunning appearance, characterized by a glossy, golden-brown crust and an intricate, complex braided shape. Many home cooks might find the braiding process a little daunting at first glance. However, there’s no need to fear! We’re here to demystify the art of Challah making, providing a simple, straightforward recipe that yields consistently fantastic results. You’ll soon discover that achieving this stunning, showpiece loaf is much easier than it looks.
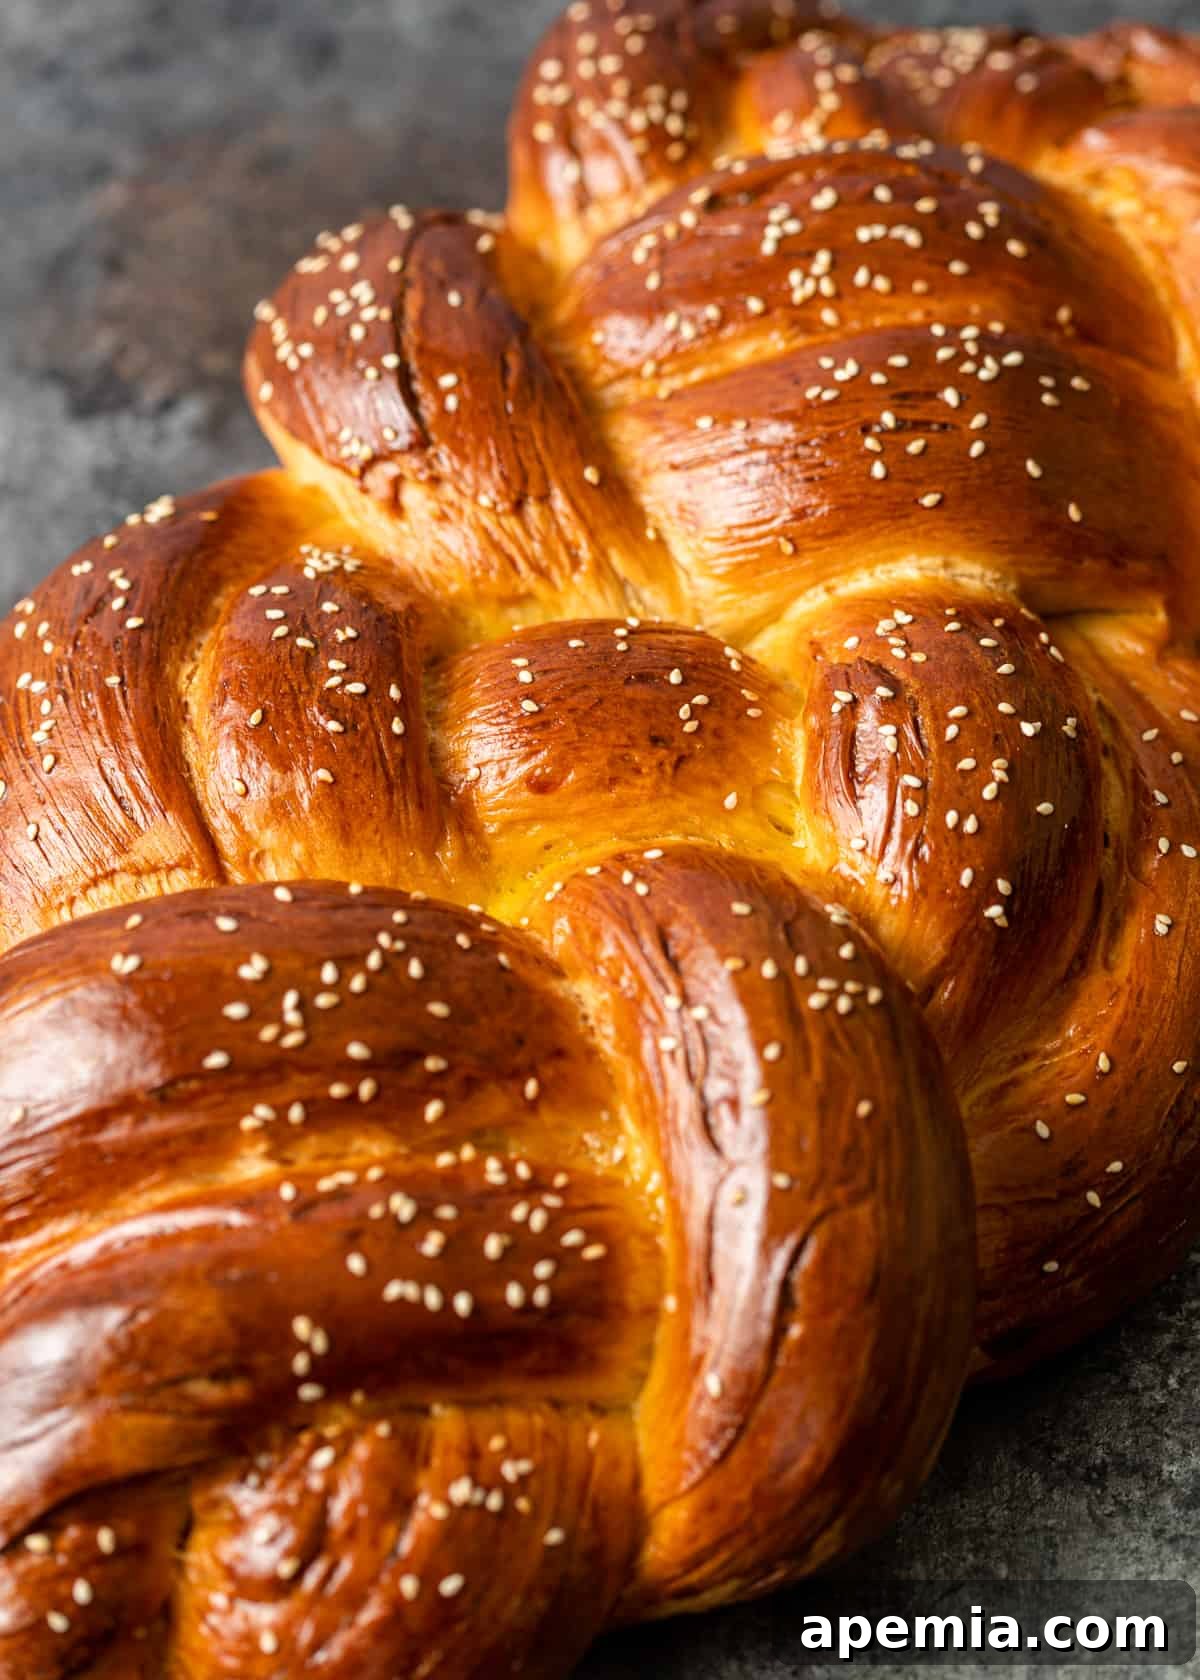
Beyond its striking visual appeal, Challah truly excels in taste and texture. Each bite offers a delightful fluffiness and airiness, complemented by a perfectly balanced flavor profile. The honey imparts a gentle, floral sweetness, while a hint of salt and subtle sesame seeds add a savory depth that makes this bread truly unique. It’s a bread that feels special yet comforting, perfect for a wide array of culinary pairings.
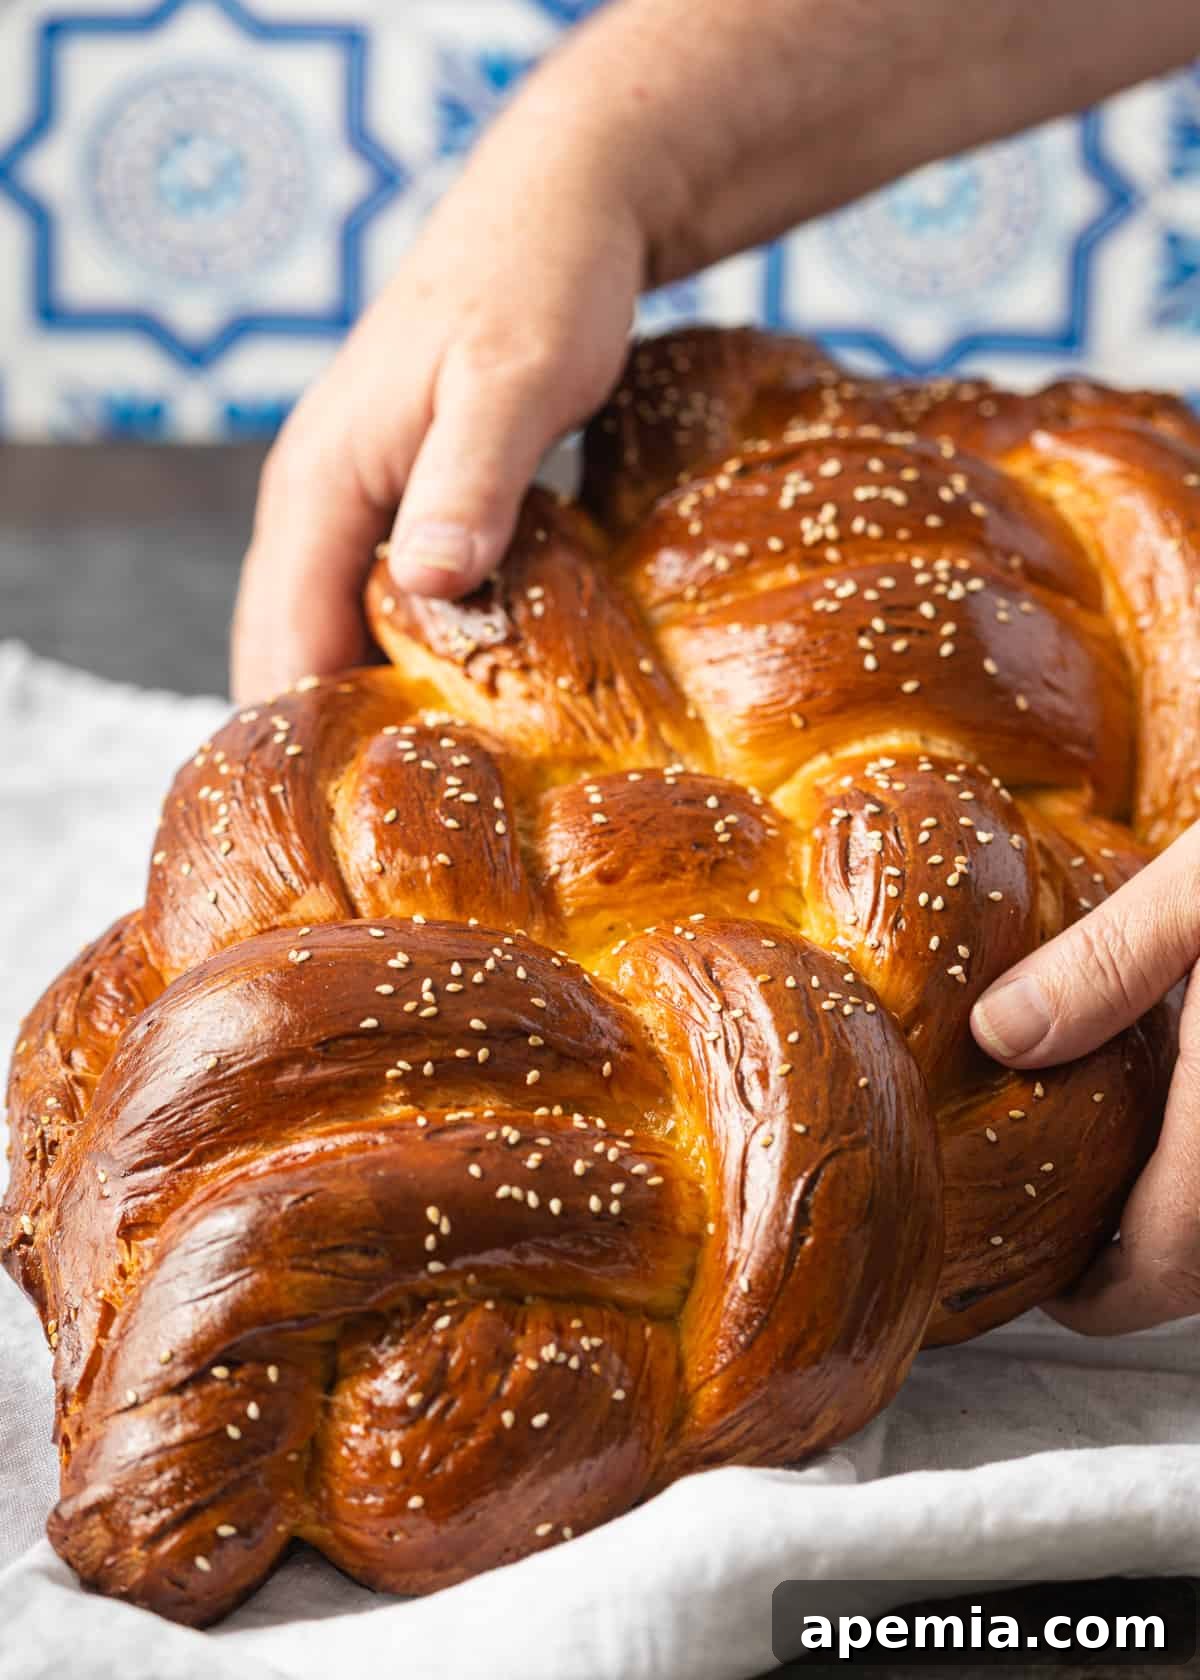
Table of Contents
- Challah: History and Significance
- Expert Challah Baking Tips
- Ingredient Notes and Substitutions
- How to Make Challah: Step-by-Step
- Recommended Tools
- Storing and Reheating
- Frequently Asked Questions
- Challah Bread (6 Braid Tutorial) Recipe
This beautifully light and flavorsome loaf is incredibly versatile. Enjoy a generous chunk dipped into a comforting bowl of matzo ball soup, or transform it into an unforgettable breakfast with our Challah French toast recipe. It pairs wonderfully with almost anything, from savory spreads to sweet jams, making it a true staple for any meal.
Challah: History and Significance
Challah, deeply rooted in Jewish tradition, is more than just a bread; it’s a symbol of celebration, rest, and blessing. Its origins trace back centuries, with the word “challah” itself referring to the portion of dough separated and set aside as an offering during ancient times, a practice still symbolically observed today. Historically, this rich, braided bread became synonymous with Shabbat (the Sabbath) and Jewish holidays, embodying the sanctity and joy of these special times.
The distinctive braided shape of Challah holds various symbolic meanings. Some interpret the braids as a representation of love and unity, while others see them as a ladder to heaven, or even as interwoven arms, signifying the togetherness of the community. Traditionally, two loaves are placed on the Shabbat table, symbolizing the double portion of manna that fell from heaven for the Israelites in the desert before Shabbat. The eggs and oil in the recipe contribute to its rich, festive quality, distinguishing it from everyday bread.
While its cultural and religious significance is profound, Challah’s appeal has extended far beyond its traditional context. Its tender crumb, subtle sweetness, and beautiful presentation have made it a favorite among bread lovers of all backgrounds. This recipe aims to honor its heritage while making it accessible for everyone to enjoy its deliciousness.
Tip From Kevin
Expert Challah Baking Tips
- Choose the Right Flour: For that perfect tender yet chewy Challah texture, bread flour is your best friend. Its higher protein content facilitates better gluten development, which is crucial for the bread’s structure and elasticity.
- Patience with Rising: A light, airy loaf depends heavily on proper proofing. Allow your dough to rise fully in a warm, draft-free environment. Additionally, when braiding, aim for tightness; this helps the loaf maintain its beautiful shape and structure during baking.
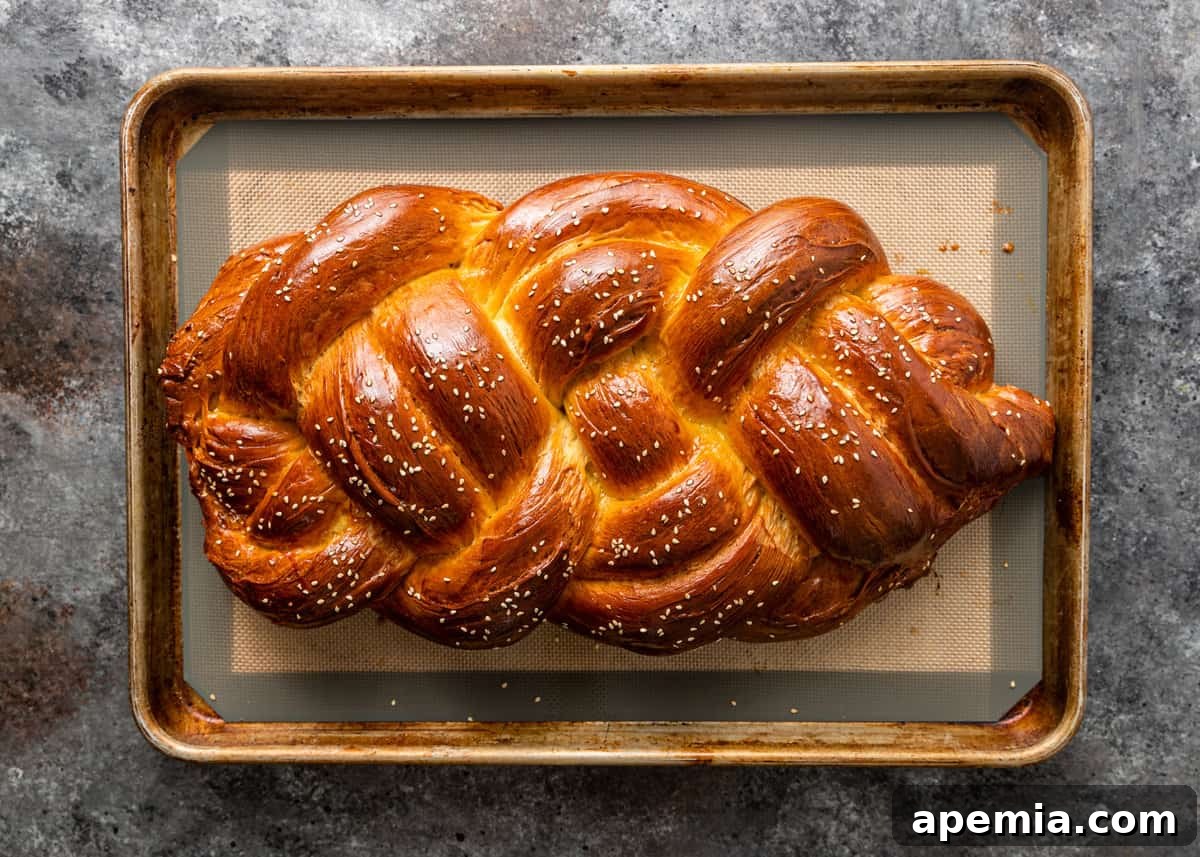
- Double Egg Wash for Shine: The signature deep golden, glossy crust of classic Challah comes from a double application of egg wash. Apply the first coat before the final rise, and the second just before placing it into the oven. This creates an unparalleled sheen and rich color.

Ingredient Notes and Substitutions
(Be sure to check the recipe card below for a full list of ingredients and quantities)
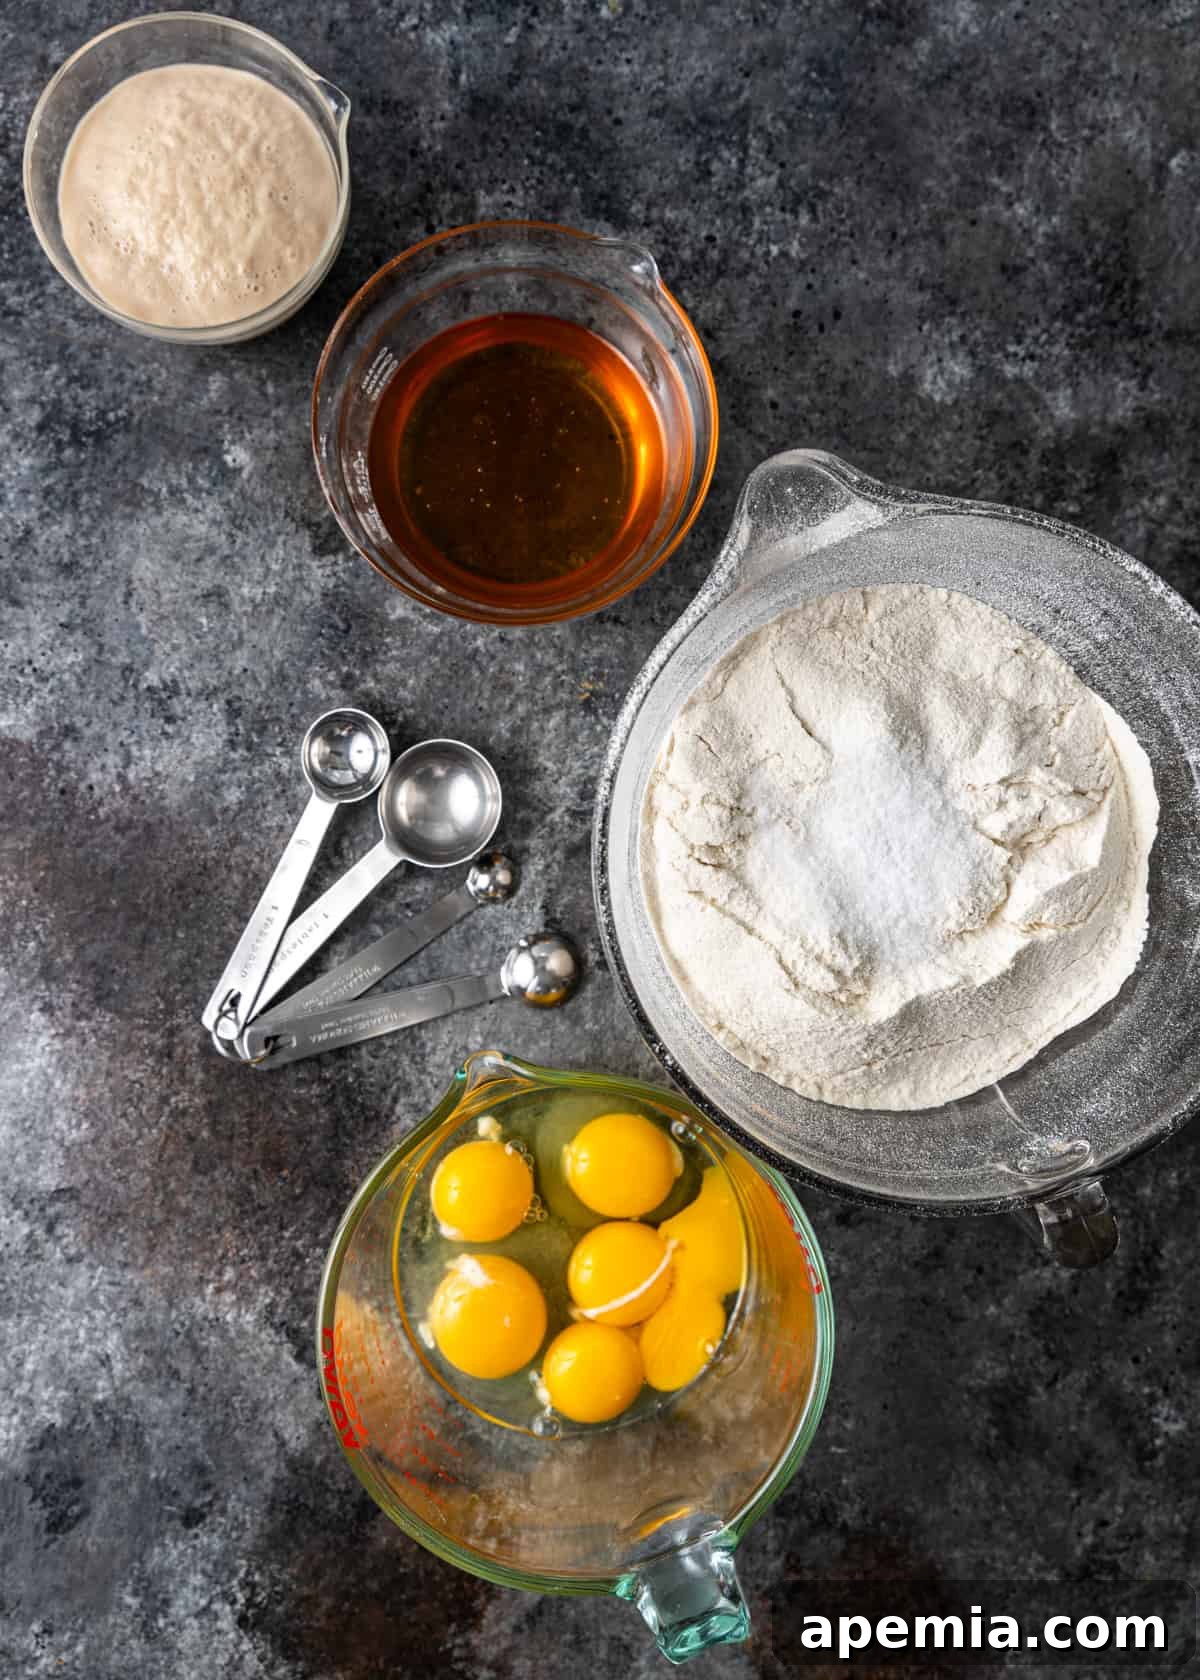
- Instant Yeast – This amazing leavening agent is baking’s magic dust! Yeast is a natural fungus that, when activated by warm liquid and fed by sugar, produces carbon dioxide. This gas creates bubbles within the dough, causing it to rise and giving Challah its signature soft, airy texture. Ensure your yeast is fresh for optimal results.
- Warm Water – The temperature of your water is crucial for activating the yeast. Aim for around 95-105°F (35-40°C), which feels comfortably warm to the touch. Water that’s too hot can kill the yeast, while water that’s too cold won’t activate it effectively, hindering your bread’s rise.
- Bread Flour – Specially milled to have a higher protein content than all-purpose flour, bread flour is ideal for yeast breads like Challah. It forms stronger gluten strands, which are essential for creating that desirable chewy yet airy texture and structure that holds its shape through proofing and baking. If you’re in a pinch, all-purpose flour can be used, but your loaf might be slightly less chewy.
- Kosher Salt – Salt is not just for flavor; it also plays a vital role in controlling yeast activity and strengthening gluten structure. It gives the bread its classic, slightly savory undertone, which beautifully balances the sweetness from the honey. Fine sea salt can be substituted, but adjust quantity slightly as kosher salt is less dense.
- Honey – This natural sweetener is a hallmark of Challah, contributing more than just sweetness. It adds a gentle, rounded flavor and a floral depth that is characteristic of this bread. Honey also helps with moisture retention, keeping the Challah fresh for longer, and aids in achieving that beautiful golden-brown crust. Agave nectar or maple syrup could be used, but the flavor profile will differ slightly.
- Eggs – Eggs are paramount in Challah, providing richness, moisture, and structure. In this recipe, we use both whole eggs and extra egg yolks. The additional yolks lend an incredible depth of richness and tenderness to the dough, creating a more luxurious crumb than whole eggs alone. One whole egg is also reserved for the egg wash, which is essential for that signature glossy finish.
- Vegetable Oil – Oil contributes to the Challah’s incredibly soft, moist, and tender crumb, preventing it from drying out. Its neutral flavor ensures the honey and egg flavors shine through. Any other neutral-tasting oil, such as canola or grapeseed oil, works as an excellent substitute.
- Sesame Seeds – A sprinkle of sesame seeds on top before baking adds a lovely textural contrast and a subtle nutty flavor, completing the classic Challah presentation. Poppy seeds or everything bagel seasoning are also delicious alternatives.
How to Make Challah: Step-by-Step
- Bloom the Yeast: In a small bowl, combine your instant yeast with warm water (ideally around 95-105°F or 35-40°C). Stir gently and let it rest for 5 to 8 minutes. You’ll know your yeast is active when it becomes foamy and fragrant, indicating it’s alive and ready to work its magic.
- Prepare the Dough: In the bowl of a stand mixer fitted with a dough hook attachment, add the bread flour and kosher salt. Turn the mixer to a low speed to combine. Gradually pour in the yeast mixture, followed by the honey, the two whole eggs, the four egg yolks, and the vegetable oil. Increase the mixer speed to medium-low and knead for 4 to 6 minutes. The dough should come together, becoming smooth, elastic, and slightly tacky but not overly sticky. Scrape down the sides of the bowl as needed to ensure all ingredients are incorporated.
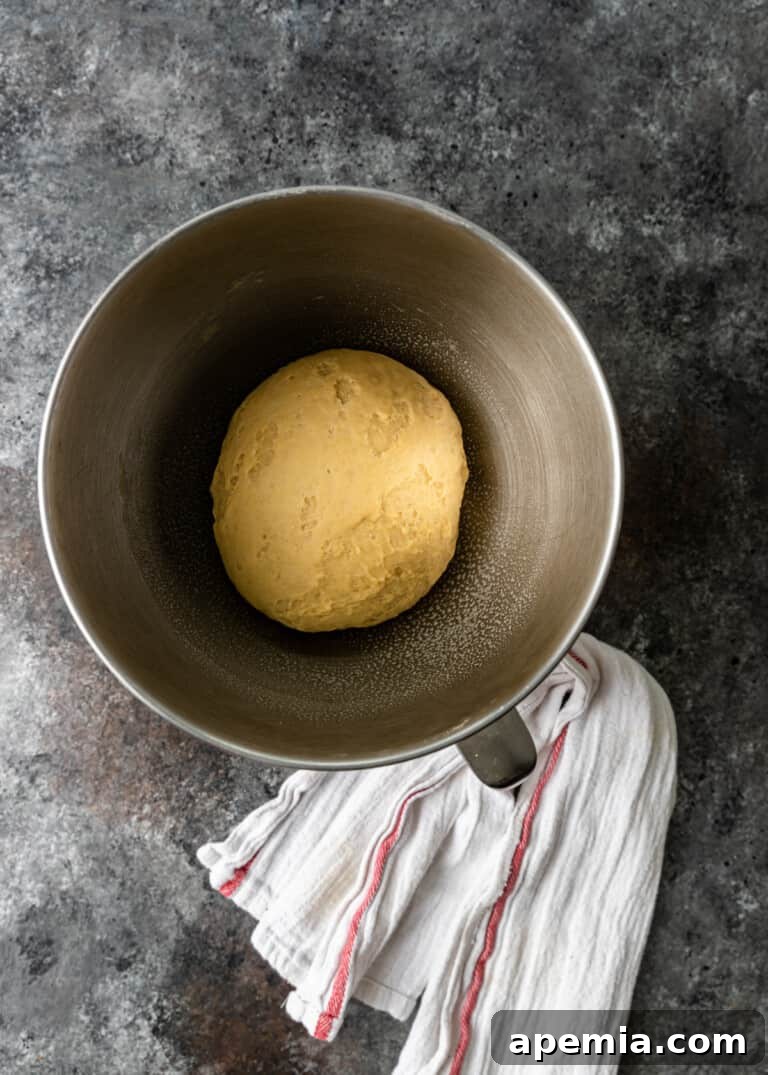
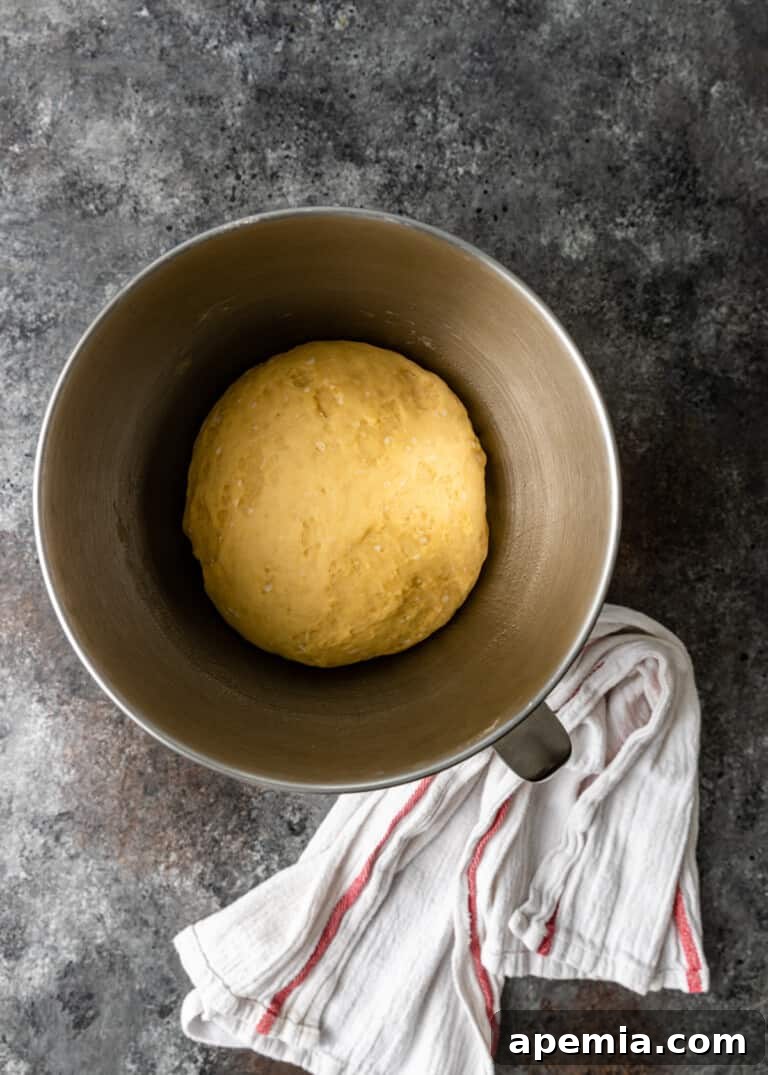
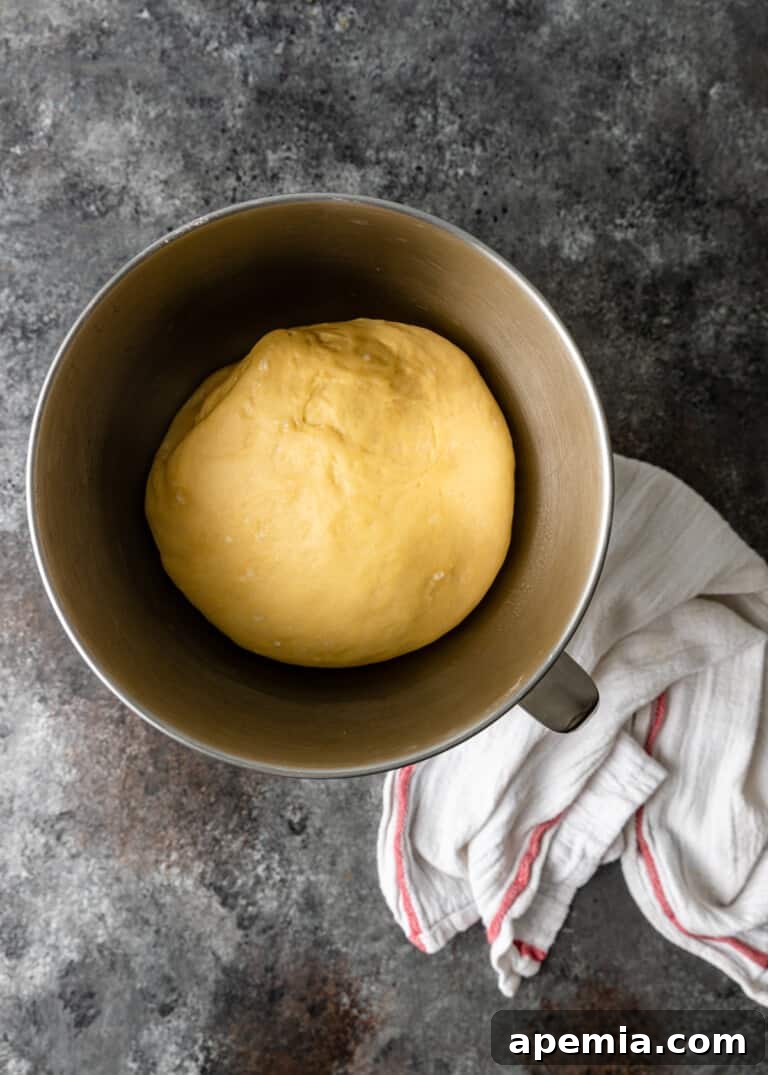
- First Proofing and Folding: Lightly grease a medium-sized bowl with a little oil. Shape your kneaded dough into a smooth ball and place it in the greased bowl, turning it once to coat lightly. Cover the bowl tightly with plastic wrap or a damp kitchen towel. Place the bowl in a warm, draft-free spot (like a turned-off oven with the light on, or a sunny windowsill) for an hour, allowing the dough to double in size. After the first rise, gently remove the cover. To strengthen the gluten, take one side of the dough, pull it gently upward, and fold it over towards the center of the ball. Turn the bowl 90 degrees and repeat this pulling and folding process three more times, for a total of four folds. Flip the dough over so the seam side is down, re-cover, and let it rest for another hour.
- Divide and Rest: Once the dough has completed its second rise, gently transfer it to a lightly floured surface. Divide the dough into six equal pieces. For precision, you can weigh each piece to be approximately 160 grams. Gently shape each piece into a rough rectangle (they’ll look a bit like hot dog buns). Cover these pieces with a damp cloth and let them rest for an additional 15 minutes. This resting period allows the gluten to relax, making the dough much easier to roll out.
- Roll Out the Ropes: Lightly dust a clean work surface with flour. Take one piece of dough, keeping the others covered to prevent drying. Gently roll out each rectangle into an 18-inch long rope. Start rolling from the middle of the dough and work outwards, gently tapering the ends to create a uniform rope. If you find the ropes shrinking back excessively as you roll, it means the gluten needs more relaxation. Simply cover the stubborn ropes and let them rest for another 5 minutes before trying again.
- Braid the Dough (6-Braid Method):
Mastering the 6-Braid Challah
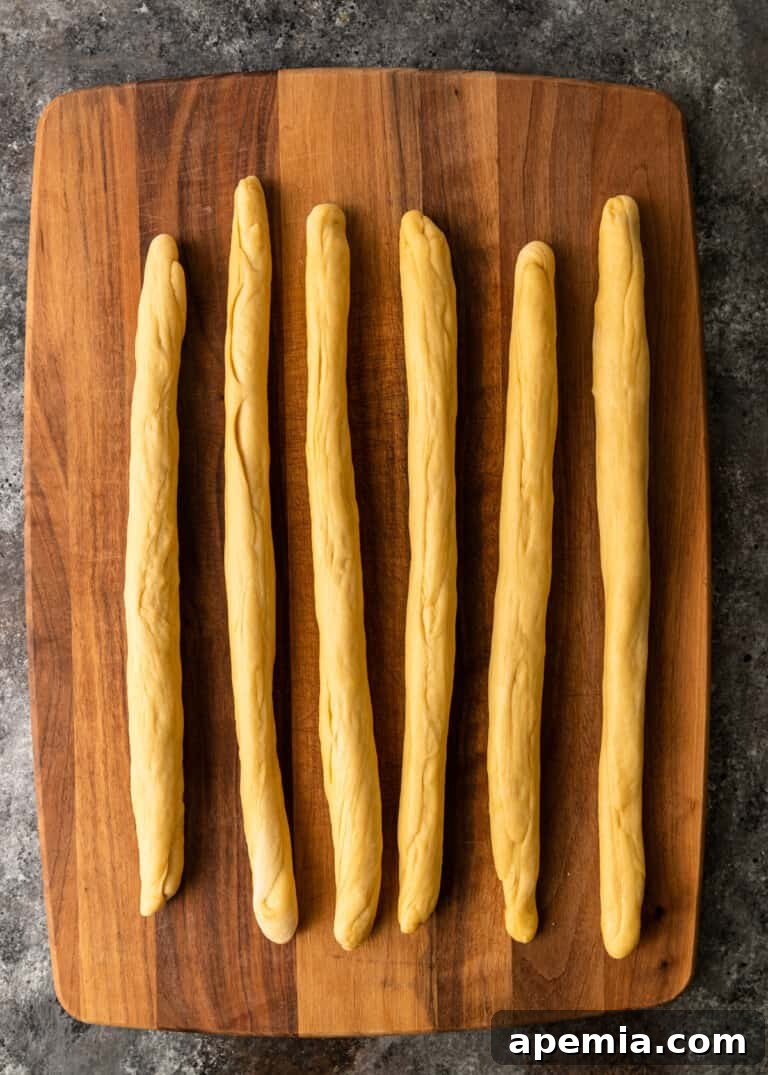
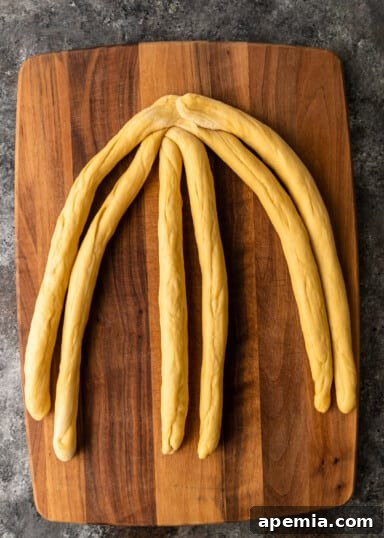
This is where the magic happens! Arrange your six 18-inch ropes side-by-side on your floured work surface. Firmly pinch all six strands together at one end to form a secure starting point. Now, mentally number your ropes 1 through 6 from left to right.
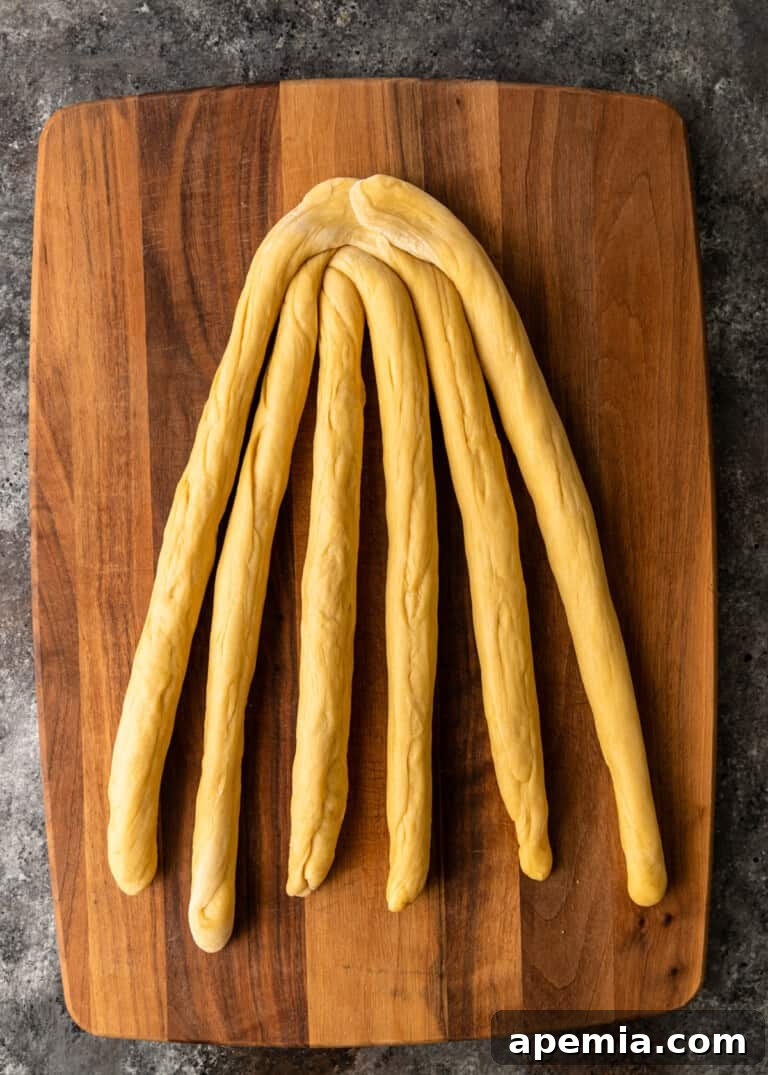
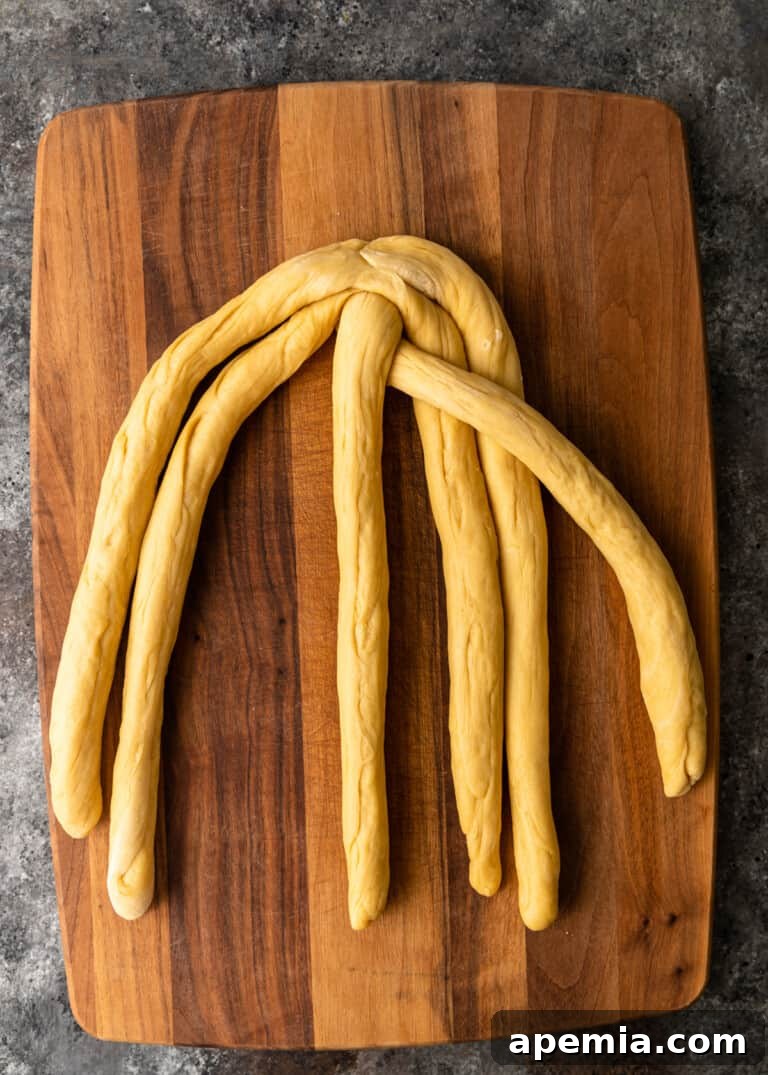
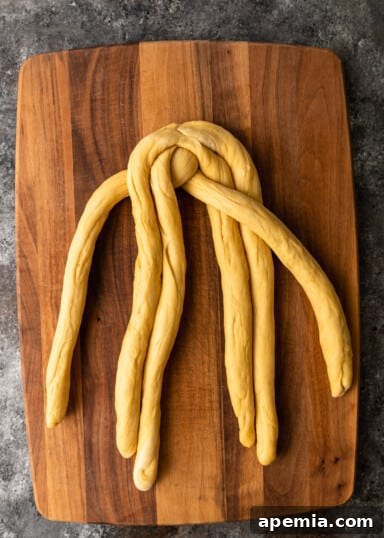
- Initial Setup: Visually divide your six ropes into three groups of two. Move the first two ropes (1 & 2) slightly to the left, keep the middle two (3 & 4) in the center, and move the last two (5 & 6) to the right. See the corresponding image in the gallery above for visual guidance.
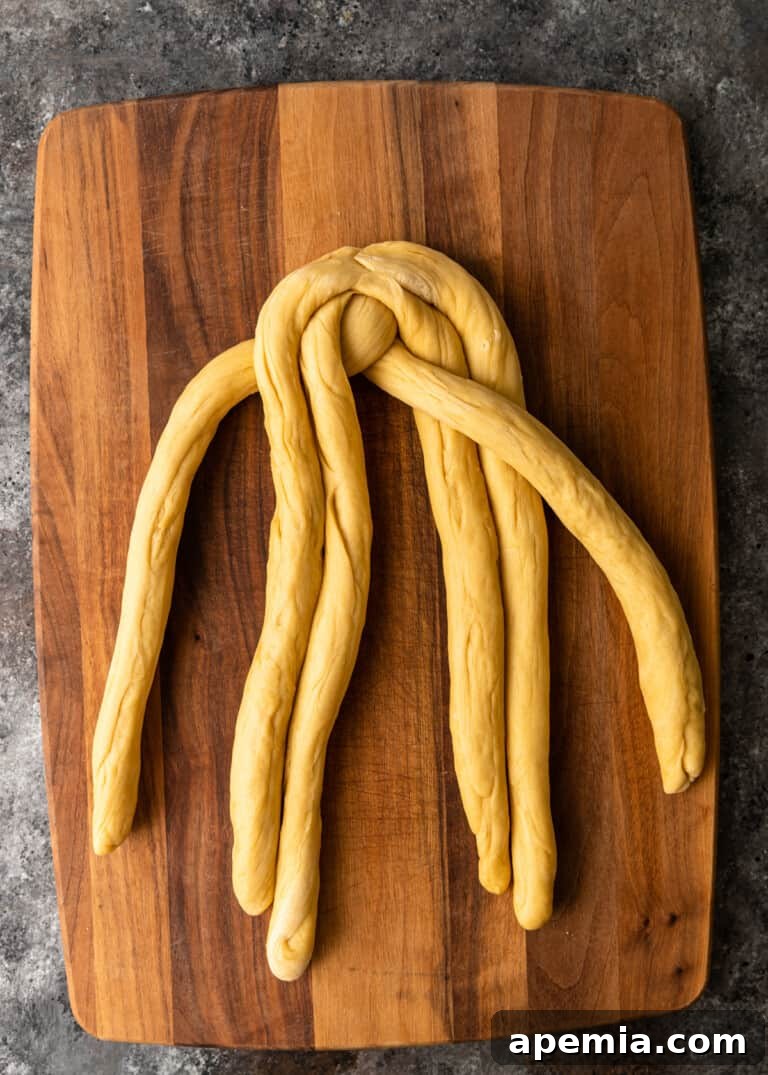
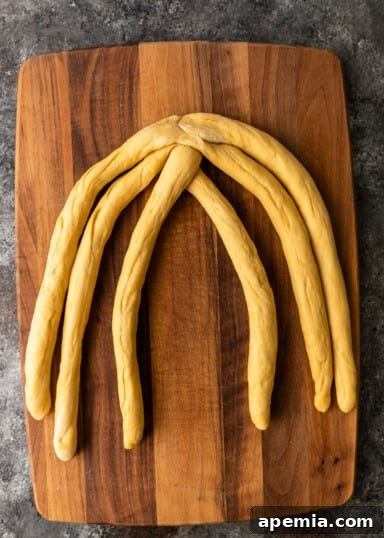
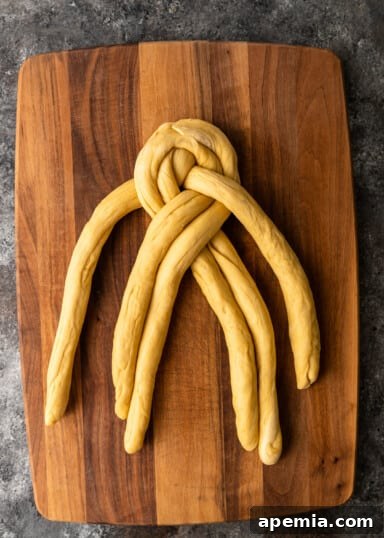
- First Crossover (Right to Center): Take rope 4 (the second rope from the left of the center pair) and move it UP and OVER rope 3 (the first rope of the center pair). It should now be to the left of rope 3. (Refer to the 2nd image in the gallery’s second row).
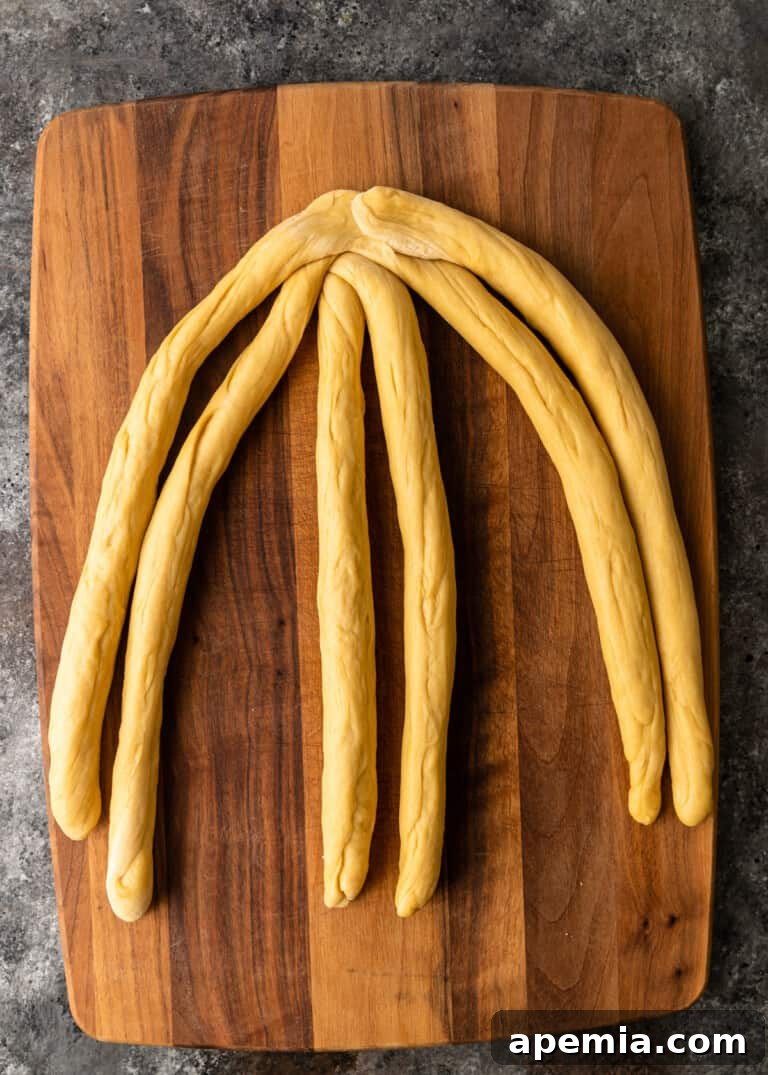
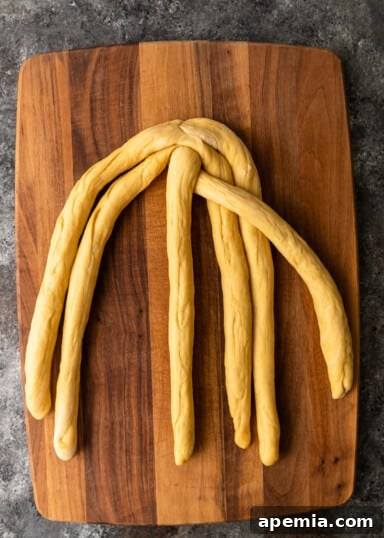
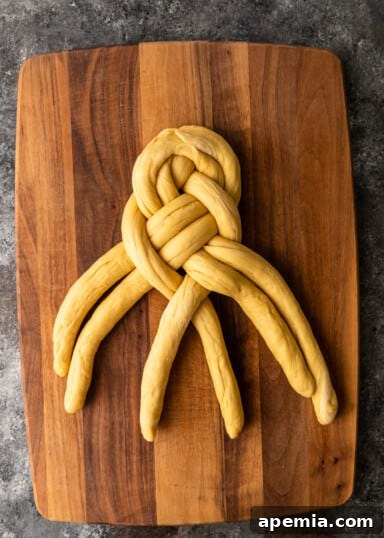
- Second Crossover (Center to Far Right): Now take rope 3 (which is currently second from the left) and move it UP and OVER ropes 5 and 6 (the entire rightmost pair). Rope 3 should now be on the far right, outside of ropes 5 and 6. Ropes 5 and 6 effectively move to the center position. (Refer to the 3rd image in the gallery’s second row).
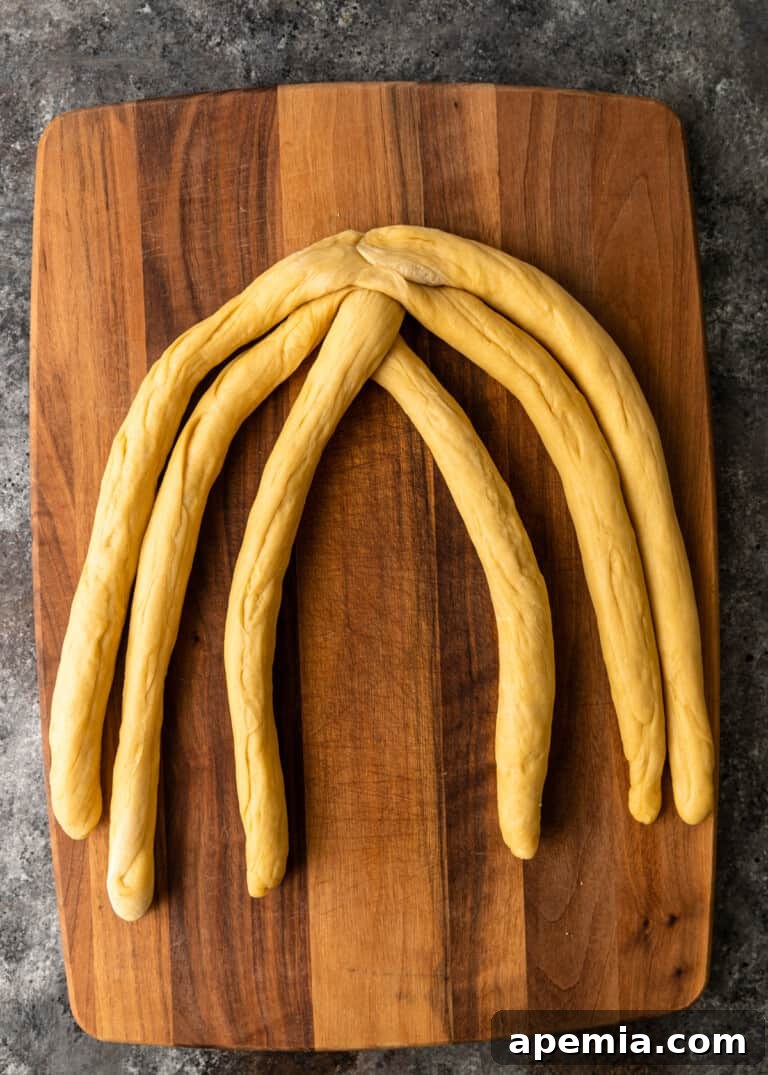
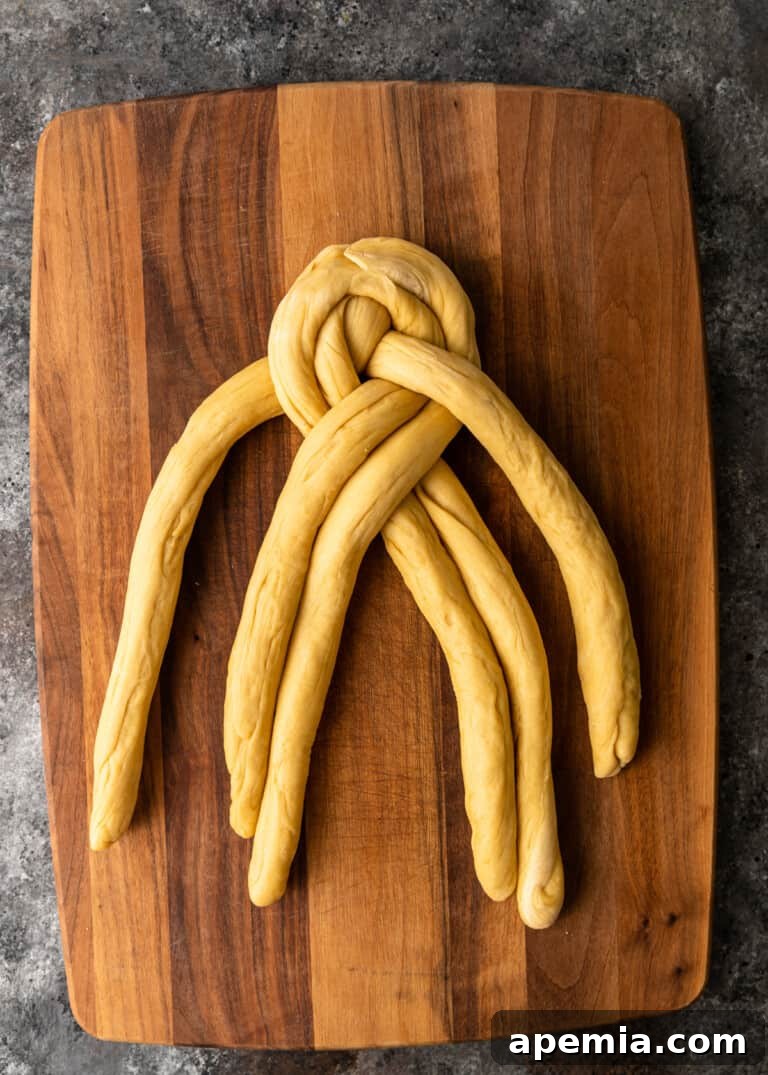
- Third Crossover (Center to Far Left): Take rope 4 (which is now to the right of ropes 1 and 2) and move it UNDER ropes 1 and 2 (the entire leftmost pair). Rope 4 should now be on the far left, outside of ropes 1 and 2. Ropes 1 and 2 effectively move to the center position. (Refer to the 1st image in the gallery’s third row).
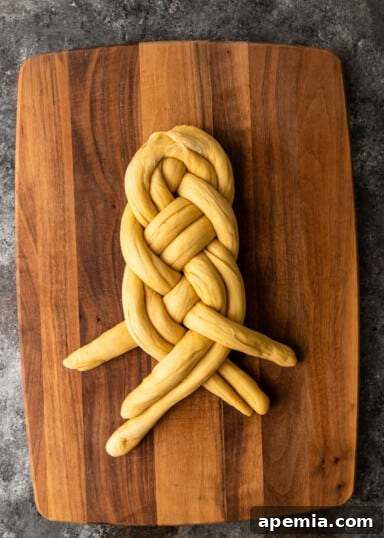
- Fourth Crossover (Center Adjustment): Now, identify the two innermost ropes that are currently next to each other in the center. Take the SECOND of these two center ropes and move it UP and OVER the FIRST center rope. This helps maintain the consistent weaving pattern. (Refer to the 2nd image in the gallery’s third row).
- You should now have: One single rope on the far left, two sets of two ropes in the center, and one single rope on the far right. This is your repeating pattern setup.
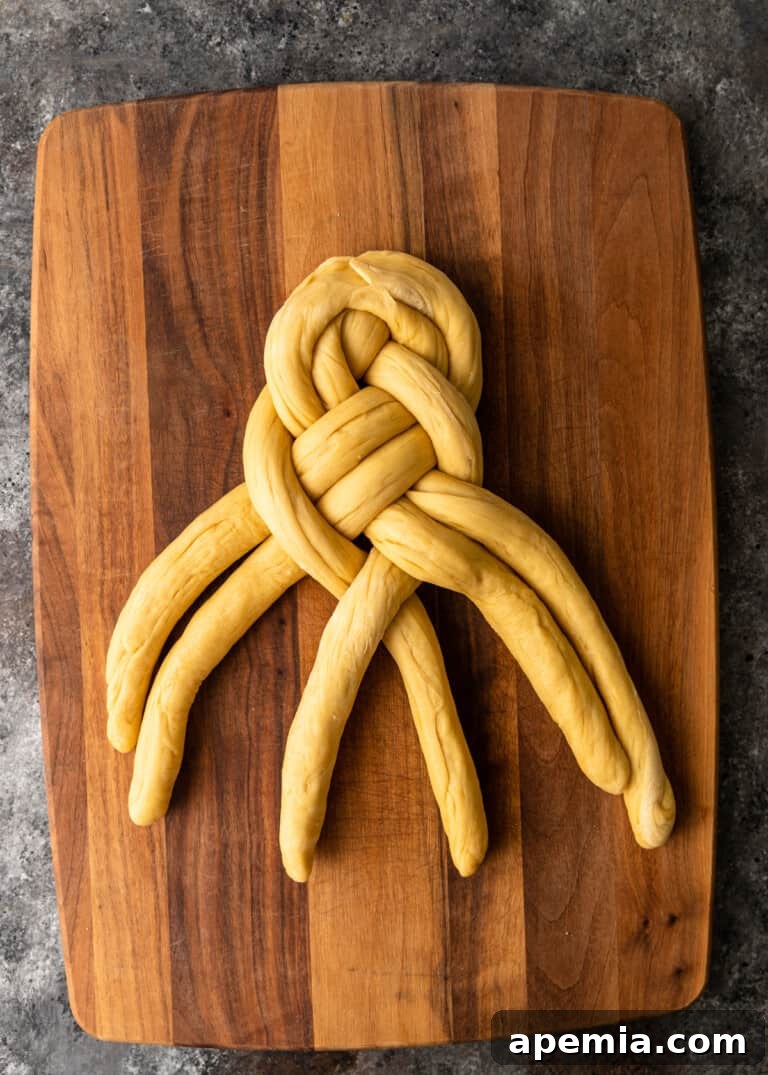
- Repeating Pattern (Left Side): Lift the single rope on the far left UP and OVER the left set of two ropes in the center. The left set of two ropes now moves to the far left position. (Refer to the 3rd image in the gallery’s third row).
- Repeating Pattern (Right Side): Lift the right set of two ropes UP and OVER the single rope on the far right. Pull the single right rope DOWN towards the center and OVER the other single center rope. This completes one full cycle of the braiding pattern. (Refer to the 3rd image in the gallery’s third row, right side).
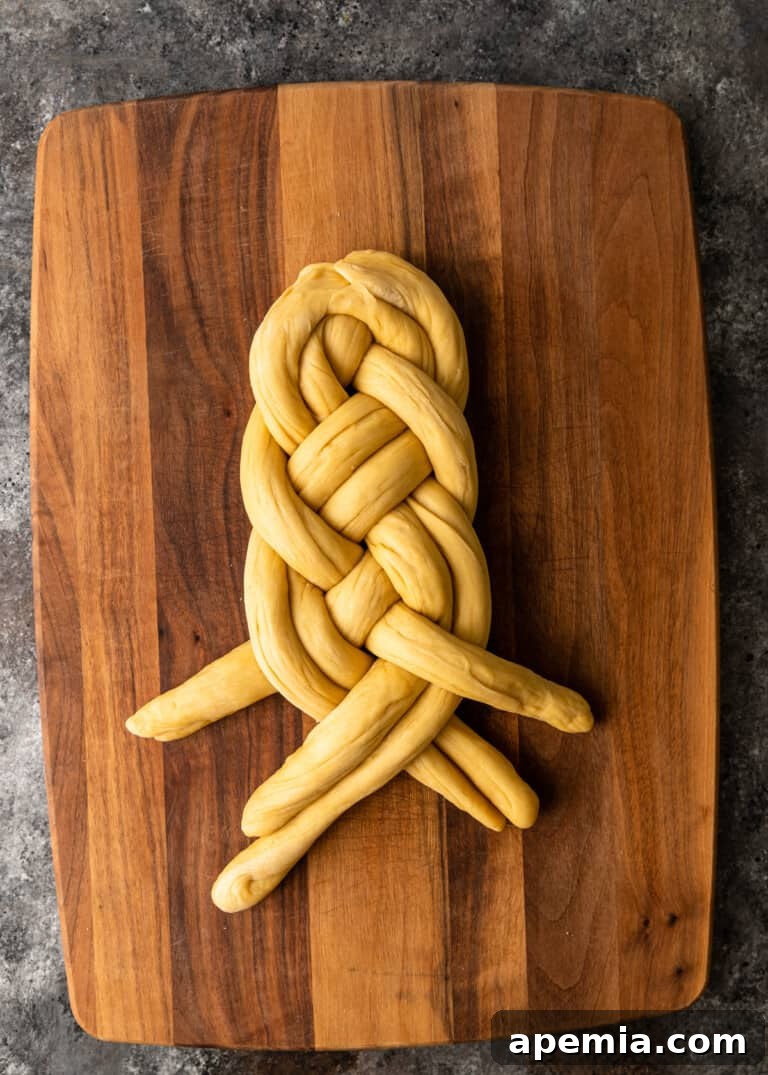
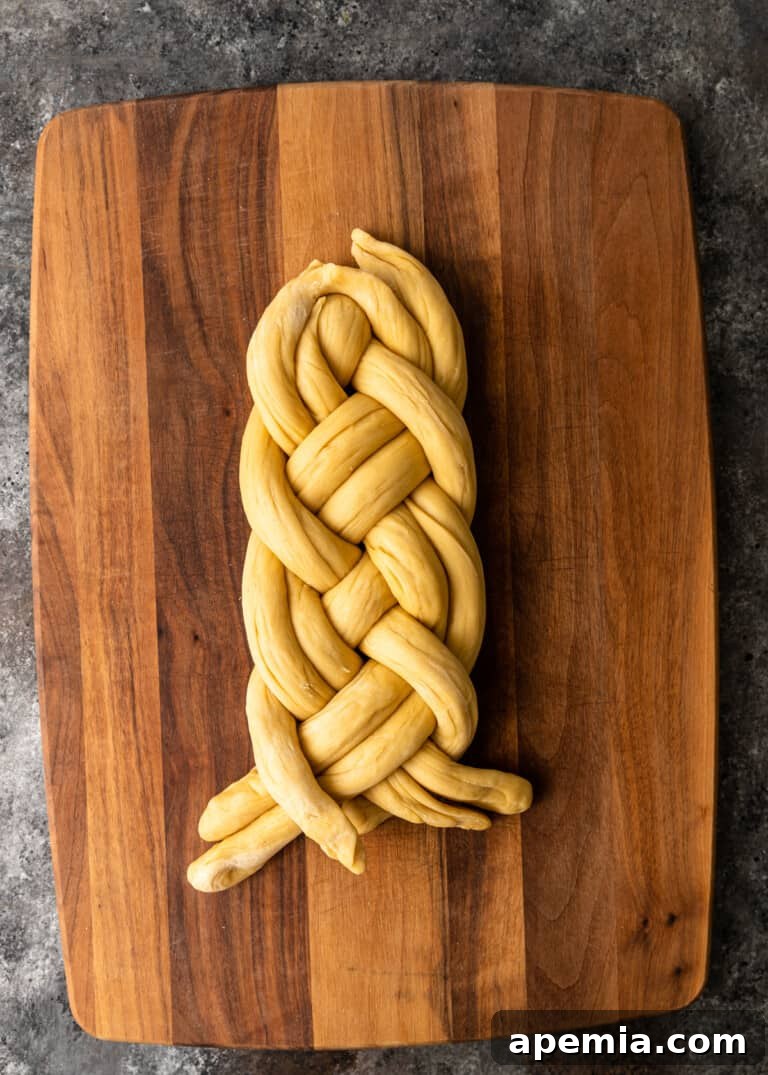
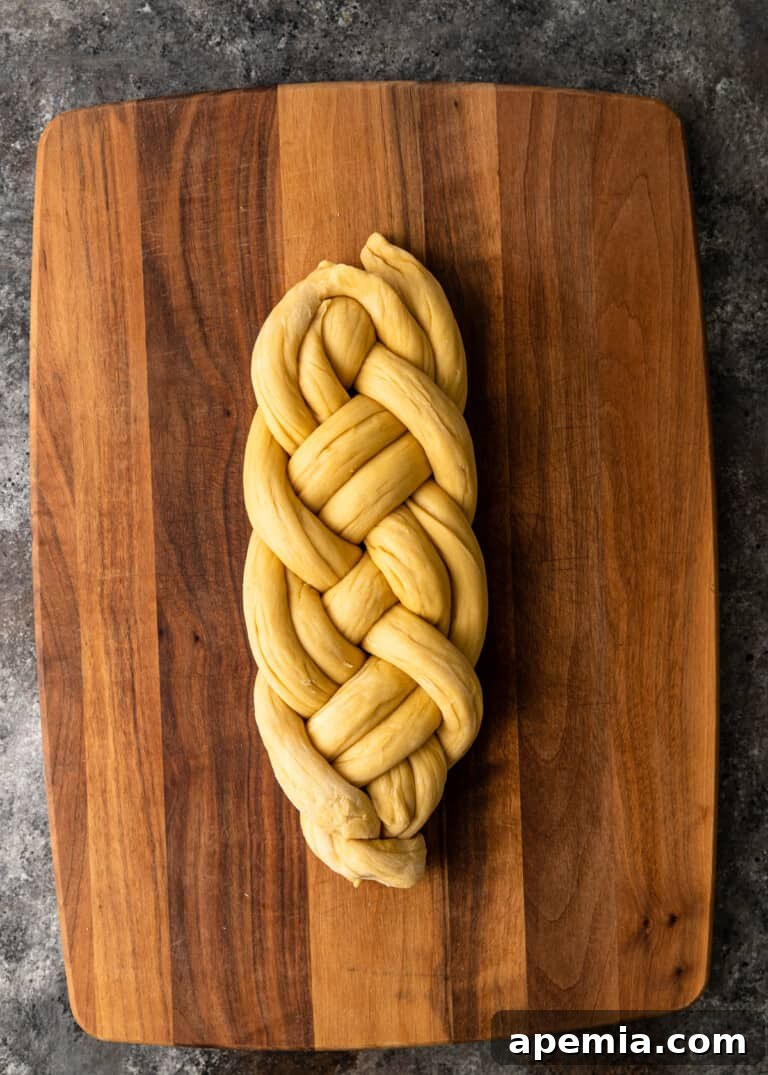
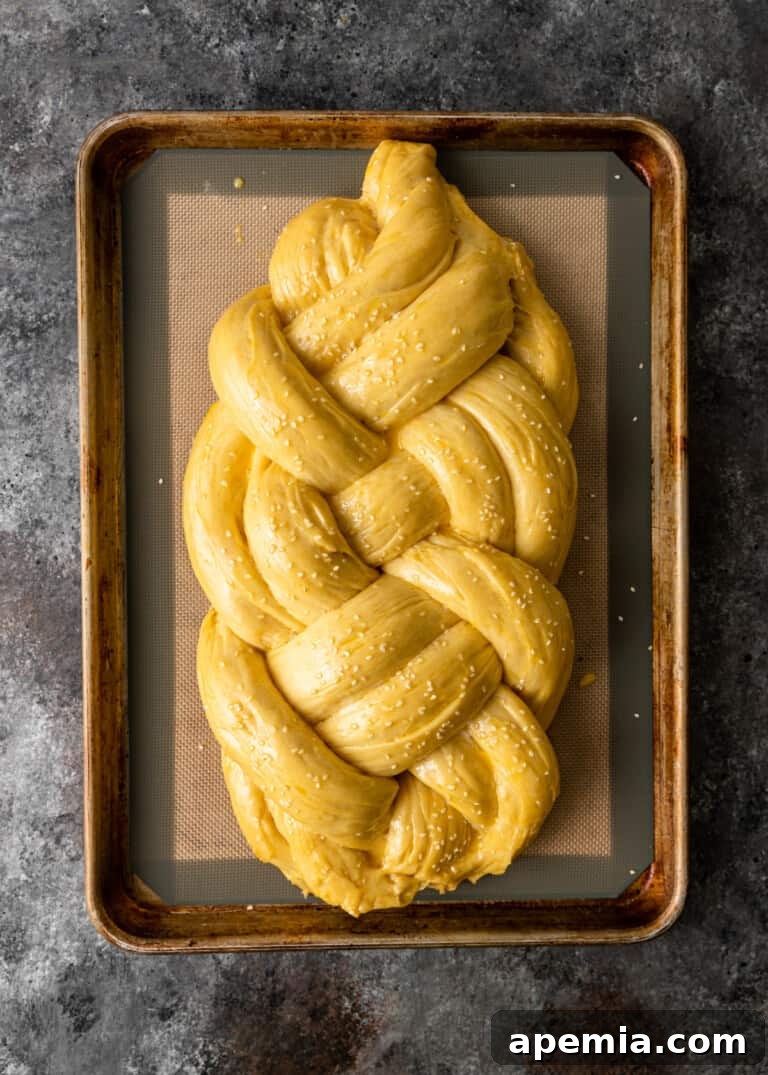
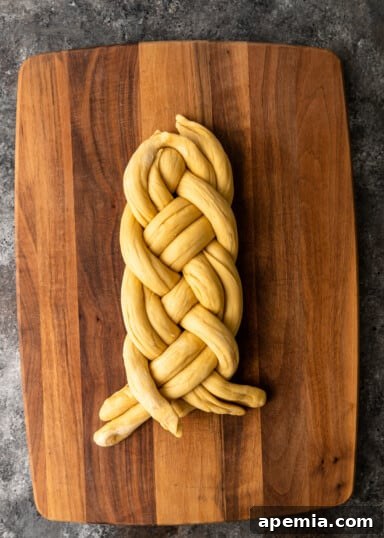
- Continue the Braid: Repeat steps 7 and 8 (the “Repeating Pattern”) until all the dough is braided. Take your time to keep the braid tight and even. When you reach the end, firmly pinch all the remaining strands together. Tuck this pinched end neatly underneath the loaf to create a seamless finish.
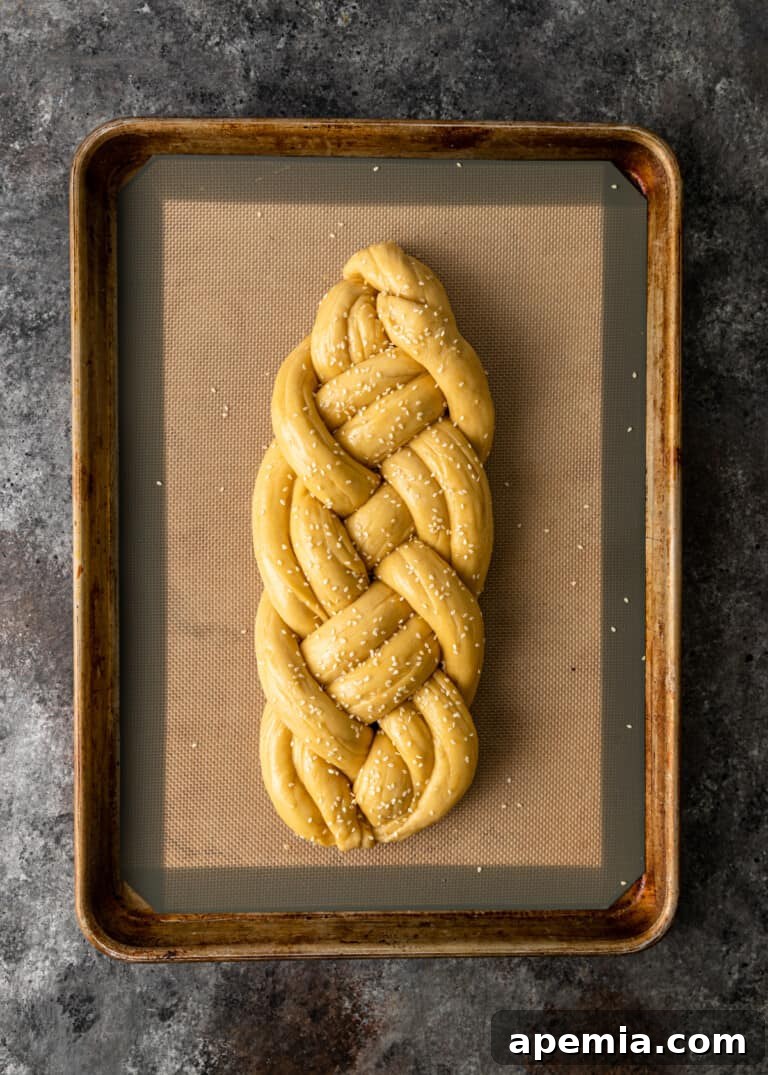
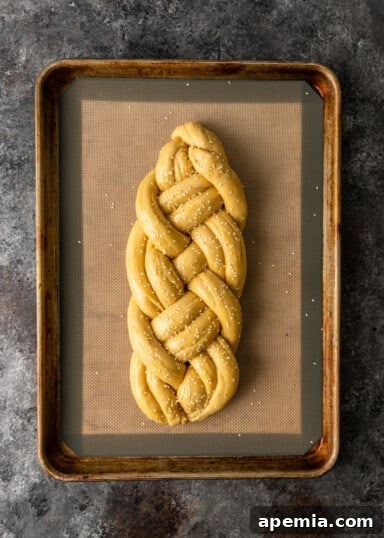
- Apply the Egg Wash & Second Proof: Carefully transfer your beautifully braided loaf onto a baking sheet lined with parchment paper. In a small bowl, whisk together one large egg with one tablespoon of water to create your egg wash. Brush half of this egg wash evenly over the entire surface of the Challah loaf. Place the baking sheet in a draft-free area and allow the bread to rise, uncovered, for a final 2 hours. This second proof is crucial for developing its light texture.
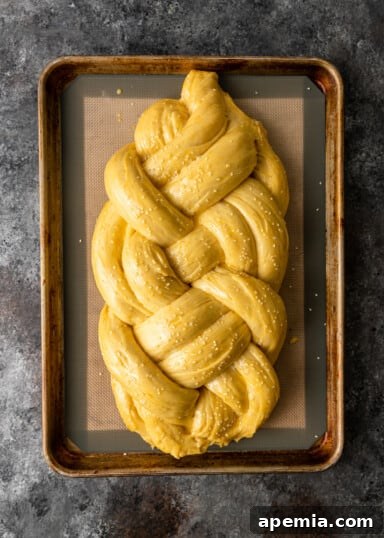
- Bake to Golden Perfection: Preheat your oven to 375°F (190°C) towards the end of the second proof. Once preheated, brush the loaf again with the remaining egg wash, ensuring every nook and cranny of the braid is coated for maximum shine. Sprinkle generously with sesame seeds (or your topping of choice). Carefully place the baking sheet into the preheated oven. Immediately reduce the oven temperature to 325°F (160°C). Bake for 45 to 50 minutes, or until the Challah achieves a rich, deep golden-brown color and sounds hollow when tapped on the bottom. If the top is browning too quickly, you can loosely tent it with foil. Once baked, remove from the oven and transfer the loaf to a wire rack to cool for at least an hour before slicing. This cooling time is essential for the bread’s internal structure to set, ensuring a perfect crumb.
Recommended Tools for Baking Challah
- Stand Mixer with Dough Hook: While Challah can certainly be kneaded by hand, a stand mixer with a dough hook attachment will save you a significant amount of effort and ensure thorough gluten development. It takes the hard work out of the long kneading process, resulting in a more consistent and perfectly elastic dough.
- Large Mixing Bowls: You’ll need at least two large bowls – one for mixing ingredients and another for the dough to proof.
- Parchment Paper: Essential for lining your baking sheet, preventing sticking, and ensuring an easy transfer of your beautiful loaf.
- Pastry Brush: A good pastry brush is key for applying the egg wash evenly, giving your Challah that irresistible shine.
- Kitchen Scale: For precise division of dough, especially when aiming for a perfectly symmetrical braid.
Storing and Reheating Your Challah
To keep your freshly baked Challah tasting its best, wrap the cooled loaf tightly in plastic wrap or aluminum foil. It will stay wonderfully fresh on your kitchen counter for up to 2 days. For longer storage, you can keep it in an airtight container at room temperature for up to a week. However, it’s best to avoid storing Challah in the refrigerator, as the cold temperatures tend to dry out bread and cause it to go stale much more quickly.
If you want to enjoy warm, soft Challah even after a few days, you can gently reheat it. For a whole loaf, wrap it loosely in foil and warm it in an oven preheated to 300°F (150°C) for about 10-15 minutes, or until heated through. Individual slices can be warmed briefly in a toaster or toaster oven until lightly crisp and warm. For the ultimate freshness, Challah also freezes exceptionally well! Wrap a completely cooled loaf tightly in plastic wrap, then again in foil, and freeze for up to 3 months. Thaw at room temperature and reheat as desired.
Share this recipe on Pinterest!
Love this recipe? Share it with the world on Pinterest.
Frequently Asked Questions
Challah is incredibly versatile and can be enjoyed in countless ways! It’s fantastic for dipping in savory soups like matzo ball soup, and thick slices make for exceptional sandwiches, especially with deli meats or cheese. Its slightly sweet, rich flavor and tender texture also make this bread ideal for sweet applications, such as a decadent Challah French toast, bread pudding, or simply toasted with butter and jam for breakfast.
If you’re planning to bake for a large crowd or want to have extra on hand, we recommend doubling the quantities in the recipe. However, instead of trying to bake one supersized loaf, it’s best to bake two separate loaves. This ensures even cooking, consistent rising, and prevents any issues with fitting an oversized loaf in your oven. Plus, two smaller loaves offer more golden crust per serving!
Several common pitfalls can affect your Challah. Firstly, ensure your water temperature is just right for the yeast – too hot will kill it, too cold won’t activate it, both leading to a flat loaf. Secondly, be careful not to add too much flour; this can result in a dry and dense bread. Always measure flour correctly, preferably by weight, and only add enough to make the dough manageable. Lastly, don’t rush the proofing process; proper rising is essential for the airy texture. Following our recipe closely should help you avoid these issues and achieve a perfect, fluffy loaf every time.
While both Challah and Brioche are rich, egg-based breads, they have distinct differences. Challah typically uses oil as its fat, making it pareve (dairy-free), and often includes honey for sweetness. Brioche, on the other hand, is known for its high butter content, which gives it a very rich, almost cake-like texture, and it usually contains milk. Both are delicious, but Challah offers a unique combination of sweetness, chewiness, and a slightly denser yet still airy crumb that stands apart from Brioche’s buttery decadence.
Absolutely! While a stand mixer simplifies the kneading process, Challah dough can be kneaded by hand. It will require about 10-15 minutes of vigorous kneading on a lightly floured surface until the dough is smooth and elastic. It’s a great arm workout and a very satisfying process to feel the dough transform under your hands!
Challah Bread (6 Braid Tutorial)
16
slices
5 hours
15 minutes
45 minutes
6 hours
PrintRecipe
Video Tutorial
Watch our detailed video tutorial for visual guidance on making and braiding your Challah bread perfectly!
Ingredients
-
2
tsp
instant yeast
-
1/3
cup
plus 2 tbsp warm water -
4 1/4
cups
bread flour
-
2
tsp
kosher salt
-
1/4
cup
honey
-
2
large eggs
-
4
large egg yolks
save whites for other use -
1/4
cup
vegetable oil
Egg Wash
-
1
large egg
-
1
tbsp
water -
1
tbsp
sesame seeds
Instructions
Dough Preparation
-
In a small bowl, mix instant yeast with warm water (approximately 95°F/35°C). Let it sit for 5-8 minutes until foamy.
-
In a stand mixer fitted with a dough hook, combine bread flour and salt. On low speed, pour in the yeast mixture, honey, 2 whole eggs, 4 egg yolks, and vegetable oil. Mix on medium-low speed for 4-6 minutes, scraping the sides as needed, until the dough is smooth and elastic.
-
Lightly grease a medium-sized bowl. Shape the dough into a ball, place it in the bowl, and cover with plastic wrap or a damp towel. Let it proof in a warm place for 1 hour, or until doubled in size.
-
After the first rise, remove the cover. Gently pull one side of the dough up and fold it toward yourself. Turn the bowl 90° and repeat this pulling and folding a total of 4 times. Flip the dough over (seam-side down), cover again, and let it rest for another 1 hour.
-
Divide the dough into 6 equal pieces (about 160 grams each). Shape each piece into a rough rectangle (like a hot dog bun), cover, and allow to rest for 15 minutes to relax the gluten.
-
Dust a clean work surface with flour. Roll out each dough rectangle into an 18-inch rope, starting from the middle and tapering the edges. Keep other ropes covered with a damp towel. If ropes shrink, rest them (covered) for 5 minutes before trying again.
Braiding Instructions
-
Lay out your 6 ropes and firmly pinch them together at one end. Separate the ropes into 3 sets of 2: move 2 to the left, keep 2 in the center, and move 2 to the right. (See image 1 in the braiding gallery above for visual aid).

-
Counting Left to Right, move rope 4 up and over rope 3 in the center. (See image 2 in the braiding gallery’s second row).
-
Move rope 3 up and over ropes 5 and 6 (the rightmost pair). Ropes 5 and 6 move to the center, and rope 3 becomes the new outside right rope. (See image 3 in the braiding gallery’s second row).
-
Move rope 4 under ropes 1 and 2 (the leftmost pair). Ropes 1 and 2 move to the center, and rope 4 becomes the new outside left rope. (See image 1 in the braiding gallery’s third row).
-
Next, move the second set of 2 ropes in the center up and over the first set of 2 ropes in the center. (See image 2 in the braiding gallery’s third row).
-
At this point, you should have 1 rope on the far left, 2 sets of 2 ropes in the center, and 1 rope on the far right. This is your repeating pattern setup.
-
Lift the left single rope over the left set of 2 ropes in the center. The left set of 2 ropes now moves to the far left. (See image 3 in the braiding gallery’s third row).
-
Lift the right set of 2 ropes up and over the right single rope. Pull the right single rope down to the center and over the other single center rope. (This is a continuation of image 3 in the braiding gallery’s third row, right side).
-
Continue repeating this pattern until all the dough is braided. When finished, firmly pinch all the edges together at the end and neatly tuck this pinched end underneath the loaf for a clean finish.
Egg Wash and Final Proof
-
Place your braided loaf on a parchment paper-lined baking sheet. Brush half of the egg wash (1 large egg + 1 tbsp water, whisked) evenly over the entire loaf. Set aside in a draft-free area for its final rise, uncovered, for 2 hours. The loaf should look noticeably puffy.
Baking Instructions
-
Preheat your oven to 375°F (190°C). Just before baking, brush the loaf one last time with the remaining egg wash and sprinkle generously with sesame seeds. Place the loaf in the oven and immediately reduce the temperature to 325°F (160°C). Bake for 45-50 minutes, or until the Challah is a rich, deep golden brown and sounds hollow when tapped on the bottom.
-
Let the Challah cool on a wire rack for at least 1 hour before slicing. This allows the internal structure to set properly.
Nutrition
Calories:
170
kcal
|
Carbohydrates:
29
g
|
Protein:
6
g
|
Fat:
3
g
|
Saturated Fat:
1
g
|
Trans Fat:
1
g
|
Cholesterol:
79
mg
|
Sodium:
307
mg
|
Potassium:
69
mg
|
Fiber:
1
g
|
Sugar:
5
g
|
Vitamin A:
110
IU
|
Vitamin C:
1
mg
|
Calcium:
21
mg
|
Iron:
1
mg
The information shown is an estimate provided by an online nutrition calculator. It should not be considered a substitute for a professional nutritionist’s advice.
breads
Jewish
Kevin
Have You Made This Recipe? Let Me Know on Instagram
Tag @keviniscooking or tag me #keviniscooking!